The first time software is to be added the menu will be:
Help | Install New Software
Next, Next again and click
through the license agreement and hit Finish.
If it does not, bring up the preferences window:
Window | Preferences
Then do
Team | SVN | SVN Repositories. When you click
on SVN Repositories, the "Subversion Connector Discovery" window
will pop up. (See http://www.polarion.com/products/svn/subversive/connector_discovery.php
for details.)
If you don't have Subversion installed on your machine, then skip to the next step.
To determine which version of Subversion is being run, start up a DOS or Cygwin shell and run
svn --version. To start a DOS Shell:
- Windows Server 2003 or Windows XP:
- Click on Start > Run > and type
cmd - Windows Vista and 7
- Click on Start and type
cmd
svn --version
If
svn --version returns 1.6, then install SVN Kit 1.3.8 or equivalent.
If
svn --version returns 1.7, then install SVN Kit 1.7.9 or equivalent.
If you do not have the
svn command installed, then select the most
recent SVN Kit and you should be able to download ptII using the SVN Kit supplied by Eclipse.
Note: if you install a more recent version of the plugin than the
version of the command line svn tool, then
you will not be able to use the command line svn to
update or modify the tree that is checked out by Eclipse.
If you
run svn on a tree checked out by Eclipse and get a message
 svn: This client is too old to work with working copy '.'; please get a newer Subversion
	    client
, then the solution is to
update svn.
Then do "Finish", "Next", "Next", Accept the license and then "Finish".
ptII
Subversion repository.
In Eclipse, add the ptII SVN Repository:
Window | Show View | Other | SVN | SVN Repositories
To see the SVN Repositories pane, you may need to close the Eclipse Welcome Window by clicking on the x in the tab.
New | Repository Location and
set the url.
To check out the ptII svn repository with read-only access:
https://repo.eecs.berkeley.edu/svn-anon/projects/eal/ptII
Note: Most users will select the /svn-anon/ URL above because
they will be accessing the tree with read-only Subversion access.
If you have an UC Berkeley EECS LDAP account or have an external account on repo.eecs.berkeley.edu, then check out ptII with read/write access:
https://repo.eecs.berkeley.edu/svn/projects/eal/ptII/Read/writes users may want to check "Save authentication".
Click "Finish"
Read/write users will be prompted for their repo.eecs.berkeley.edu username and password.
Trust or Trust Always. For details and
a workaround, see Certificate is not issued by a trusted authority.
trunk and select Find/Check out As
Follow the wizard, creating selections as follows:
Be sure to check out the trunknot the entire tree, which include all the branches and the trunk.
- In the "Check Out As" window, keep the default,
Check out as a project configured using the New Project Wizard, then hitFinish.
(IfCheck out as a project configure using the New Project Wizardis disabled, then the problem is someone checked a.projectfile into the repository.)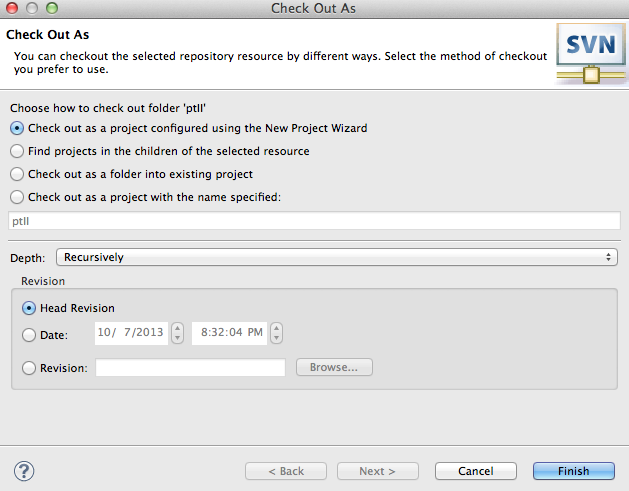
- In the "New Project" window, select "Java" > "Java project", Click "Next".
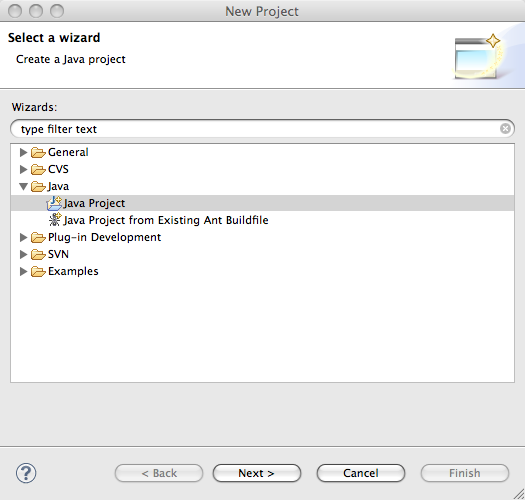
- In the "New Java Project" window:
In "Project name", enter any project name,ptIIis a common choice.
In "Project Layout", check "Use project folder as root for source and class files". If "Project Layout" is not selectable, then that means that there is already a.eclipse.epffile in the default location. This is usually not a problem, but to be safe, exit Eclipse, remove the file and restart Eclipse.
The issue here is that by default, Eclipse generates .class files in abin/directory. However, the Ptolemy II source repository has scripts in$PTII/bin/. If Eclipse places .class files inbin/then$PTII/bin/makefilewill not exist and$PTII/bin/vergilwill not be created whenmakeis run.
Below is the "New Java Project" windows:
- Click "Finish".
- Wait for the checkout to finish. Go get coffee.
Note:If you did not disable build automatically, as suggested above, then Eclipse will build the project and produce thousands of errors. This is not really a problem. You will fix the errors in the next step with the.classpath.defaultfile. - If you have read/write access go to Setup the Subversion Configuration to Sane Settings so that if you commit files, they will have the appropriate settings.
- All users should go on to Set up the Eclipse ptII project .classpath for Ptolemy II